


Retrowarehouse only publishes articles with little to no spelling and grammatical errors, so please check your article before submitting for publishing. This is not in any way personal nor is it intended as a negative reflection of any article’s value. It’s just not practical nor an efficient use of time to comb through large quantities of articles filled with errors.
MEDIA SPECIFICATIONS
With the “Add Media” button, you can easily add an image into your article by dragging and dropping your media files into the pop-up box.
Images:
- Valid Image File Formats = .JPG, .JPEG, .PNG, .GIF
- Maximum Image Width = 500 pixels
- Maximum Image Height = 500 pixels
- Maximum Image File Size = 250kb
- Image resolution should be no larger than 72 dpi, which will keep the file sizes below the limit.
Every article must have a “Featured Image,” the image that accompanies an article when it is displayed on the home page (read the related section below for instructions). Also see How to Create an Image Gallery for more information about images.
Audio:
See How to Add Audio to Your Article and How to Embed Audio and Video.
Video:
See How to Embed Audio and Video.
“ADD NEW PAGE” & “EDIT PAGE” LEFT COLUMN
Titles:
Always give your article a title. Enter the article’s title in the input box under “Edit Post” or “Add New.”
Body of Article:
Type or paste your article into the box that looks similar to a Microsoft Word page. Note the “Visual” and “HTML” tabs along the right top corner of editor. These enable you to switch between the semi-WYSIWYG (What You See is What You Get) or markup content editor.
When adding images to your article, please use the “Add Media” button at the upper left of the editor to include an image or images in your article. Thumbnails will automatically be created. The system will not accept images wider than 900 pixels and they should not be nearly that large if you’re including them within the body of your article (maximum 450 pixels wide).
Note that if your article is to be featured in the home page slider or if you want an image to appear on the home page with the article title, please see “Featured Image” below.
Good Writer Checkify:
GWC includes a checklist for you to review when completing your article.
“ADD NEW PAGE” & “EDIT PAGE” RIGHT COLUMN
Post Tabs:
For long articles, you might want to divide your article into smaller sections by either using the Page Break option or the Post Tabs options.
If you decide to use the “Page Break” option, you can either use the markup editor by clicking on the “HTML” tab along the upper right of the editor window in the left column, then inserting the Page Break tag (<!--nextpage-->) code or click on the Page Break icon in the Visual Editor at the place where you want to divide your page:
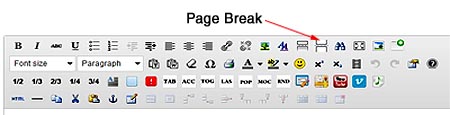
Refer to the article entitled, Hitchcock’s Cameos!, for an example of how the Page Break option will look in your article (look for “Pages: 1 2” on the right just above the author’s bio).
If you decide to use the “Post Tabs” option, you must first activate this feature by selecting “Enable WP Post Tabs Feature” in the box. Then refer to the box below to see how to make your tabs:
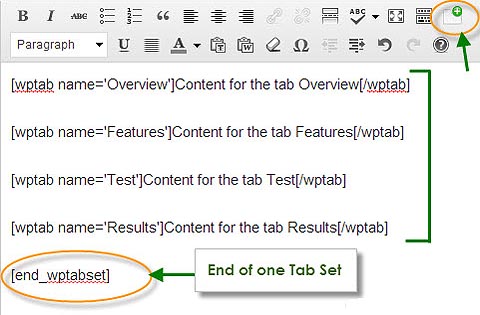
The example above will result in four (4) tabs named Overview, Features, Test, and Results. Your content for each will replace the areas labeled “Content for the tab Overview” and “Content for the tab Features” and so on to place related content in each tabbed section of your article.
Refer to the article entitled, Battle of The Titans: Close vs. Streep, for an example of how the Post Tabs will look in your article.
Publish:
Make sure you click “Publish” to submit a new article (or “Update”) once you’ve completed it, or “Save Draft” to save any changes if you plan to work on it later.
Categories:
Select one or more categories and deselect “Uncategorized” in the “Categories” box to categorize your article. Choose up to five (5) categories that best fit your article’s focus and choose the lowest-level applicable sub-category(ies). The article will automatically be searchable in any associated main Category(ies). Please note that Retrowarehouse periodically adds new Categories, so review the list carefully when posting new articles and editing existing articles.
Tags:
From the “Tags” box, click on “Choose from the most popular tags” and then click on the appropriate word or term to associate your article with a related short description. If no appropriate word or term currently exists, you can type a word or term (or multiple words and terms separated by commas) in the Tags input field, then click the “Add” button to attach the Tag to your article.
Featured Image:
Every article MUST HAVE a Featured Image, because this is the image that accompanies an article when it is displayed on the home page. The image you use as an article’s Featured Image should be at least 500 pixels by 375 pixels and must be one that your own. To include an image as “featured,” click on the link in the “Featured Image” box and follow the prompts. Please note that Retrowarehouse reserves the right to remove any images at our discretion.
Format:
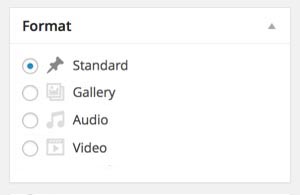
Select your article’s format—the type of article you are writing—from the “Format” box in the right column. Retrowarehouse feature four types of articles: Standard, Gallery, Audio, and Video. A description of each follows and explains the different types of articles.
Standard
This is the normal type of article posted in the default format, where your article begins with its content. Your standard article can contain a photo gallery like the one in the The Making of A Thriller article.
To post this type of photo gallery in your article, upload your photos to your Retrowarehouse dropbox folder, then send me an e-mail to setup your gallery. Once this process is complete, you will receive a reply with the shortcode that should be included at the place where you want the gallery to appear in your article. See the following for an example of the shortcode.
[gallery gid=# name="Gallery" skin=skinname]Note: If this is your first photo gallery of this type, you’ll need to submit a request for a folder in the Retrowarehouse dropbox. After your folder is setup, you’ll receive a reply with instructions on how to access your folder.
Gallery
Your article will begin with a gallery of images. An example of this type of format is the Ryan Neal Does SoChi article. Read How to Create an Image Gallery for instructions.
Audio
Your article will begin with a single audio, i.e., MP3, etc. Read How to Add Audio to Your Article for more information.
Video
Your article will begin with the first occurence of a YouTube, Vimeo or DailyMotion video tag or link. An example of this type of format is the Montell Jordan Concert article.
Audio & Video:
Please see How to Add Audio to Your Article and How to Embed Audio and Video.